Thursday, April 18, 2013

Delicious Soft Pretzels!

      I have about a million pins on my "fun food" board on Pinterest.  I've been wanting to try so many of the recipes, and now pretty much whenever I decide to bake something, I go to my board and find the right pin.  Because of this, if you look for soft pretzel recipes, you'll find I have about 5 different ones saved!  I finally got around to trying one, and I found the easiest one to try -- no dropping in boiling water, pretty simple prep, and it takes about an hour to make.

Don't these look mouth-watering?

      This "Auntie Anne's copycat" recipe is care of Yammie's Noshery. Since it's just my husband and me, I halved the recipe so we wouldn't be pigging out too excessively.  When I first made the recipe, I used 2 and a quarter cups of flour, and, like some of the original poster's commenters noted, the dough was quite wet.  It made it pretty difficult to work with, even as I floured my hands when I was shaping it into pretzels.  The second time around, I added a bit of flour, just under 1/4 cup, and it was perfect!

Way easier to knead with my hands (rather than the mixer) if I wanted to.

Lovely little pretzels!  I would make them skinnier if I had a bigger surface to roll them out on.

Since I didn't roll them really skinny, they puffed up and became all one piece.  Still delicious!
      One more thing -- the first time I made them, we had kosher salt, which was good.  The second time, we used coarse sea salt, which really gives it that pretzel look.  Just be careful you don't oversalt them, the larger salt is stronger tasting, so a little goes further than kosher salt.

Wednesday, April 17, 2013

First Home Christmas Ornament

      In 2012, my husband and I enjoyed our first Christmas since we'd been married, and in our first home, an apartment in Mississippi.  In the months leading up to Christmas, I went a little crazy with homemade Christmas ornaments -- actually, it was mostly during the summer, when I was home from work for several weeks with a broken elbow.  One of the ornament ideas that we had a lot of fun doing was salt dough ornaments.  This pin offered the idea of saving the imprint of the key to our first home.  

       Unfortunately, it didn't have a salt dough recipe attached, so I changed the link to this blog post, which is the recipe (albeit much smaller scale) we used.

       We made a fraction of a batch, so this was all it made.  Apparently, I didn't take more photos of the one with our rings imprinted on it, so I'll just tell you that I later labeled it (on the back) "Our First Christmas as Mr & Mrs".  If you make them, don't forget to poke a few holes in unobtrusive places!  If you don't, you can get unsightly darker spots.

 My husband is obsessed with dinosaurs -- see my other post about fruit snacks. :)

We don't have kids, so we used the handprint idea (from the blog post with the recipe) on our cat!

Simple as that! I wrote our address and the year on the back of this ornament.


A Helpful Home Tip

When I spotted this pin on Pinterest, boy, was I kicking myself!  


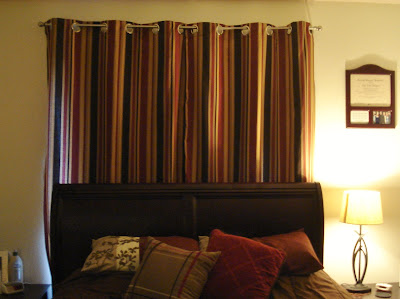
      We moved into our apartment about two months ago, and from the beginning I was not very fond of the bedroom space that required us to put our bed with the headboard by the window, and I hated that the window was off-center in the room.  I work nights, so I need my bedroom to be seriously dark.  We have morning sunlight on this window, which isn't bad, but I still have a dark brown curtain to block out the light.  In our old place, the window was in the corner and it didn't really matter that the brown curtain didn't add anything to the room.  Here, though, it's front and center visually, so I had to do something about it.  With the inspiration from the photo above, I had my husband redo the curtain rod and fixed it up nicely.


      This is after he changed the curtain rod. It looks slanted, but it's just the angle. The black rod rests on the vertical blind holders that came with the apartment. Thankfully, they were fine with us removing the blinds, because I got tired of my cat running through them right behind our heads when he wanted to look out the window at the crack of dawn.
      Before we changed it, the brown curtain was on the silver rod, slightly above the window, but it only ran the length of the black rod in this shot, so it looked pretty off-center, not to mention dead boring.


      This (above) is essentially what it looked like before (pardon the blurry picture). I have the brown curtain there now to block out more light.  Now, these curtains (below) block out nearly all the light, and are much more visually satisfying.

 The results!


      If you're wondering why our bedding is so eclectic-looking, it's because we're using our warm-weather comforter.  It looks better with our other one, but alas, my husband makes more heat than an electric blanket set on high.

Monday, April 1, 2013

Cereal Box Drawer Organizer

Since we moved, I've been reorganizing our apartment.  It's been especially important for my sanity since we downsized.  This pin offered a great solution (with stuff I already had!) for the messy junk drawer in my kitchen, so I thought I'd give it a try.  


If you're thinking about trying this too, go to the original blogger's post for the step-by-step how-to's: http://www.thestonybrookhouse.com/2012/03/messy-desk.html

Here's my process:
I was already using some little boxes in my junk drawer, so I was able to keep a few and I already knew how they might fit in the drawer.  I recommend pulling the drawer completely out if you're able to, to be able to double-check that your finished product will fit.


Having just moved, there is a plentiful supply of cardboard around.  I used a piece of cardboard on the bottom of my assembled collection of boxes to add support so that it could last longer, being able to function as one whole piece.  Also, lots of duct tape!


I covered it in cute wrapping paper I found on clearance at Target.  This project really can be done in an afternoon; it didn't take long at all for me.

Here it is in use!


In case you're wondering why we have a squirt gun in our junk drawer, it's because we have a cat who can be very bratty.